Help with DIY Project - Painting Antique Furniture
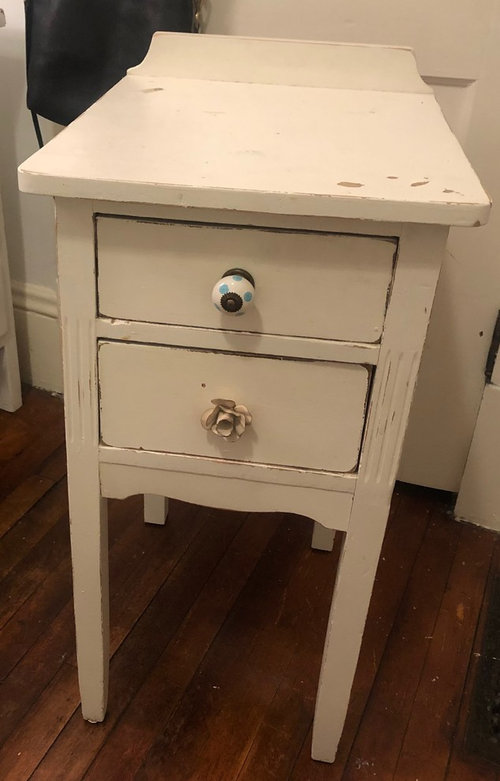
Hi everyone! I've had a cute antique vanity and side table for 15 years and want to update them to give them a more adult, modern look. I am not good at DIY projects and don't know where to begin to make sure I do this properly. Every instruction or "how to" I find is taking a piece from bare wood to painted, but these have already been painted and are chipped in several places. I'd love some advice from someone who has upcycled antique furniture that's already been painted! Do I need to get all of the paint off? Just sand lightly? Is there a different type of primer I will need than if it was bare? Will I need an electric sander or just normal sandpaper or a sanding block?
I'd also love recommendations for primers, paints, and protective coatings. I want to do an antique matte black for both with brass hardware. I've added some photos to show my current white pieces and some inspiration for what I want the end result to look like!
Thank you!!!
BEFORE:

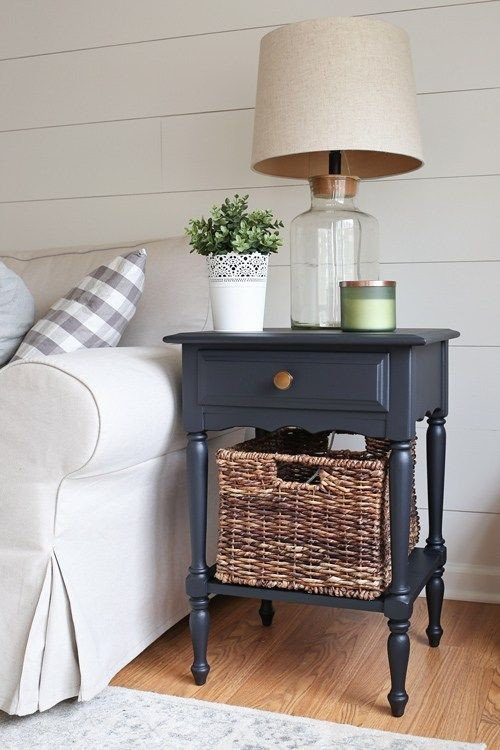
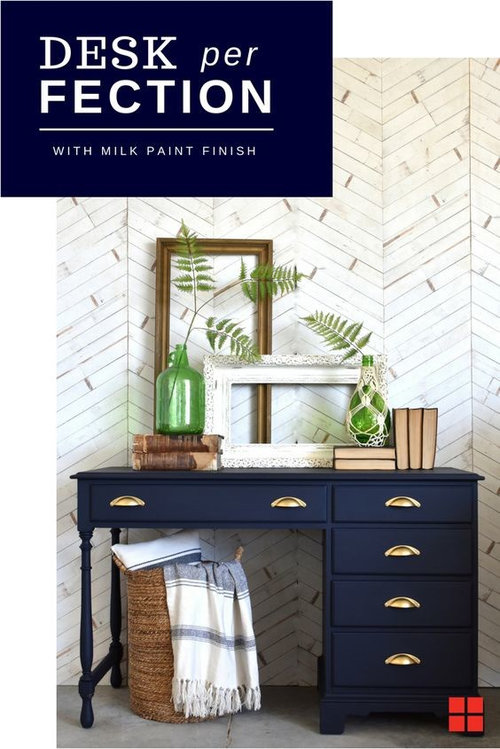
AFTER (HOPEFULLY)
I know these look more navy, but I want to do a true antique matte black. This is just for the idea.

Kommentarer (26)
 PRO
PRO1625 DB
5 år sedanYou'll need to sand pretty agressively -- with a power tool if one is availble. The goal is not to strip, but to get the flakes of paint off and then make a 'rough' surface that paint will stick to. Then prime and paint. Painting with a brush once that's done will leave a streaky finish -- its not a high end solution, but spray paint would give the most even finish. Spray paint also looks MUCH better matte than brush paint.

Olychick
5 år sedanYour inspiration pics are wonderful. Good luck and be sure to post an "after" picture!

lindahambleton
5 år sedanAn electric “palm” sander is easy to use. I have seen nice small hobby kind of sprayers but I have never used one.
Sherwin Williams have quality primers and there is usually at least one knowledgable employee to help you.
cat_ky
5 år sedanÄndrades senast: 5 år sedanI use a mouse sander for pieces like that. It works great. A very good quality primer, and buy paint meant for furniture. It has a tougher finish.

Kathi Steele
5 år sedanI strip first, then sand. I have used all kinds of strippers. None especially stand out. It depends on if I am in a small contained area or the garage.
You will need to get a high quality sprayer and spray them, especially for a matte finish.
Anne Duke
5 år sedanI used cans of matte black spray paint on a dining table and it came out really well. Took a lot of cans doing very light coats and light sanding in between. Finished with a clear coat. It was a long project, but gave new life to that table.zzuoh99
5 år sedanHave you investigated Annie Sloan chalk paint? Comes in a nice array of colors and you literally can paint without doing any stripping. Clean the piece and paint. Resulting finish is very nice. You can also add a protective wax.ljptwt7
5 år sedanI have used Anne Sloane Chalk paint on several items. Love it. But if you have chipping paint I would sand off any loose paint and make sure area is level/smooth ( you don't want it obvious after painting). But no primer neccessary.
ShadyWillowFarm
5 år sedanChalk paint is very forgiving - you’ll love it. If you have chipped paint, I’d sand it smooth, with sandpaper or a sander depending on how bad it’s chipped. Research chalk paint brands - Annie is very expensive and there are more options out there. Annie says one coat and she lies. Mostly all of them require 2 coats for a nice finish. Top with a clear coat finish, General Finishes makes a great one. Have fun and please post a pic of your finished project! YouTube is a great source of tutorials.
Lauren Lista
5 år sedanDefinitely sand the whole piece to smooth so you don't see chip marks under the new paint. Use a power sander for best results and an easier job. I like the idea of chalk paint, and I think you can decide if you want a top coat after. I love your mismatched knobs!Kathleen K
5 år sedanShould check for lead paint before sanding if they are really old.
We should trade projects. I have a black little end table i need to paint light.
Sand and wipe off dust to get a smooth finish. There special tack cloths that refinisher use to wipe dust from sanding between coats. I did that with oil based paints and epoxy tub paint but I think chalk paints would be easier. You would only need to wipe the sanding dust off once. For a matte finish it does need a smooth sanding. Satin finish would show less flaws than a flat matte or high gloss.
I would love to know the story on the desk design. Built for those old manual typewriters?
Kristen
Författare5 år sedanThank you to everyone for the suggestions! I will plan to get my hands on a power sander and look into chalk paint. Is there any benefit to priming with chalk paint even though some said you don’t need to? Would it be beneficial in the long run to do both?
I plan to wait to tackle this until MN weather gets a bit nicer, but will be sure to post after photos! As far as history I wish I knew more, but my mom found it for me when I was 11 at a little antique shop and let me pick out my own knobs to match my room. Now I’m 26 and still use it! My plan for future use will be in a front entry as a place for keys and mail and “junk drawer” items. Here’s how I had it styled before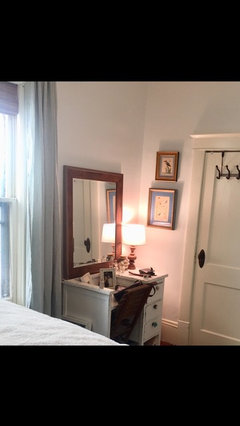

apple_pie_order
5 år sedanThe furniture is old enough to have had lead paint. Please test for it before you start sanding- a test kit is only $10 at the local hardware or big box store. The pieces will paint up nicely.
Rory (Zone 6b)
5 år sedanI would chalk paint those. I have made my own with plaster of paris and regular latex paint. Just sand off loose paint first. No need to prime. It dries quickly and all you need to do after is wax and buff.
rdy2retire
5 år sedanAnnie Sloan - graphite and black wax! Awesome black matte! 2 coats of paint. The wax gives it a great look!
Kristen
Författare4 år sedan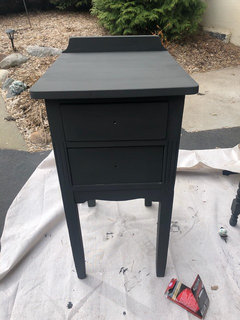
Started with the side table as my test piece. This was after sanding the entire table with medium grit sandpaper until smooth and two coats of Annie Sloan graphite chalk paint (needs a few touch-ups below the bottom drawer) Next I plan to use black wax to darken! It's turning out great so far.
cat_ky
4 år sedanCongratulations. It looks very nice. It was good to start with the smaller piece first.
Kristen
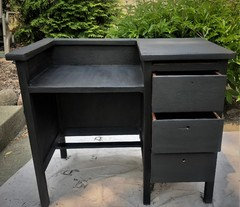
Författare4 år sedanIt's taken me a while but I've finally finished the vanity - the wood wasn't in as great of shape so it was a bit tougher!
Now I just need to decide on knobs. Should I get matching knobs with the side table or do something a bit larger/more interesting on the vanity? My only limitation is the two bottom drawers have larger holes, so the back of the knobs need to be a bit wider.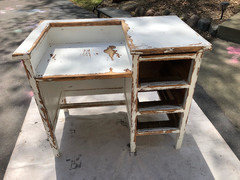
Kristen
Författare4 år sedanYes I’ve used washers before with the other knobs but some Ive tried are skinny enough that the backs fall through the front as well. I wouldn’t want a washer on the front
ci_lantro
4 år sedanOne other thing re the knobs. When you find one that works, cut a short length of clear tubing the thickness of the drawer front (an approximately the diameter of the hole) to thread the knob screw thru. It will help fill up the hole and keep the knob from wobbling in the hole.
Reload the page to not see this specific ad anymore
KristenFörfattare