DIY Kitchen Refresh (just until we gut it!)


Kommentarer (34)

gyr_falcon
9 år sedanSix days! WOW! I'm impressed. The paint stripping alone must have been extremely challenging for the timeline. Your kitchen looks great. The colors are much nicer now. That appears to have been the fridge area to the left, so I am curious where you hid the one you use.

radish
Författare9 år sedanThanks gyr_falcon! The only way I could do that much cabinet stripping was to use Citristrip, otherwise I would have killed off all my brain cells. We worked about 16 hours a day. The threat of movers arriving, and grandma showing up with your three little kids really lights a fire :)
The tenant who lived there took the fridge that fit in the alcove with him. The one that came with the house had been in the downstairs, and was too wide for that space, so we moved it to the very end of the kitchen facing the main entrance (from which most of the photos are taken).
apple_pie_order
9 år sedanFast job! Sometimes you can cover dings in vinyl or ceramic tile with a little touch up paint. Lots of instructions on the internet.

hatetoshop
9 år sedanYou must be exhausted, but it sure was worth the effort. Your kitchen looks great.
 PRO
PROCrown Construction Contracting
9 år sedanI love the color your chose for the cabinets and the choice of knobs. Great (HARD) work!!! Congrats!

marevadan
9 år sedanIsn't it great when you set your mind on getting a job done! Looks way more updated, great colours and a reflection of all your hard work. You can enjoy this space more now. I understand, we live in a split level and kitchen cabinets are 1963 original, kind of updated but I can't wait to gut and redo completely. Enjoy!

bonnielynn75
9 år sedanExcellant job! I love that you worked with what you had to create a great space.
diyer59
9 år sedanYou know, instead of eventually "gutting it", when you have time, just take off the old cabinet doors and get new ones--totally changes the look from 1958 to 2015--for a fraction of the cost.
nealmarybeth
9 år sedanReplacing the drawer fronts and doors isn't always the best and cheapest way to go. Look at everything drawer glides and hinges. New cabinets can be cheaper.kathyvangogh
9 år sedanYou did a beautiful job! That is a lot of work for a temporary solution. Maybe you'll live with it longer than intended? It's lovely. I just wanted to point out that if you must strip, Citristrip is an excellent choice. While Citristrip is a fanstastic product, they do not pretend to be non toxic, I mean it removes paint right? Next time, just use van Gogh Fossil Paint - no need to strip first, it sticks to most stuff. Here is the warning for Citristrip from Russtech: (sorry the cut and paste is a bit clumsy, but I've included a link to the source so you can go there and read it if you want to .
Precautions/Limitations:
Always use
CitrStrip
with adequate
ventilation. Avoid breathing vapors. If HVAC
intake ducts will distribute solvent odor into
adjoining occupied areas of the building, care
should be taken to block these ventilation
ducts. Wear protective gloves and goggles.
Do not apply in the presence of people or
food. People and food may be returned to
treated area when there are no longer any
odors present. Keep product along with
empty drums, pails and cans away from heat or open flame
http://russtechnet.com/wp-content/uploads/2012/07/CitristripPDF.pdfradish
Författare9 år sedanThanks everyone for your nice comments! We thought about putting new cabinet doors on as part of the refresh, but they are all non-standard sizes (and all different sizes!). Also, the drawers are wood on wood gliders, so they make sawdust everywhere (although Rockler Nyla-tape did help with that), and are in terrible shape construction wise.
I wish there were an easier way to do it, but I think everything is going to have to come out - floor, cabinets, counter, awwwwwwful black backsplash, appliances, sink...
We have a gas fireplace on the outside of the wall that the stove is on. We could move it, and then open up the kitchen, but I'd rather not. So if anyone has some great ideas about how to open up a galley kitchen without making it an open kitchen, I'd love to hear them!!radish
Författare9 år sedanGood point, Kathy Vangogh! Citristrip worked very well for me, and it is less toxic, but still a paint stripper! When I was getting desperate to be done, I tried a few doors with a regular stripper and found that it didn't work any better or faster.
Good to know about the paint that sticks to everything! We had to strip the doors for two reasons: they had so much badly painted paint on them that it was literally coming off in patches, and they smelled like cigarette smoke, which we were determined to remove from the house as fast as possible.
jazy05
9 år sedanAmazing transformation even though it's just a band-aid. Great job! love the color you chose.
Lizzy L.
9 år sedanNice job! For the terrible floor, you could put a nice kitchen-type rug down until you decide what you want to do there.
minersus
9 år sedanYou could try Flor carpet squares over the tile - make it look like wall to wall, and pick one of their heavy-duty options that hold up in commercial areas. Get extra squares for those inevitable spills . . . plus they can be easily picked up, hosed or power-washed, and re-laid as well. A checkerboard pattern can look awesome.
minersus
9 år sedanYou can also look at decals to cover the back splash tiles. Go to Etsy and search for "Bleucoin". They have loads of options and sizes for very little money.
marlene_s
9 år sedanÄndrades senast: 9 år sedanCongratulations. You have inspired me. I too have a rather nasty kitchen ('80's) that will get a facelift until we have the money to do a total reno. I've been procrastinating because it is such a big job but when I see how much you accomplished in just 6 days I feel so encouraged. By the way, we replaced our ceramic kitchen floor with hardwood for almost no money. We bought several boxes of 'rustic' hardwood at one of those discounter construction stores. These are the shorter pieces many of which are imperfect but otherwise good quality flooring. We bought 1 box more than we needed to allow for waste. It cost us a little over $100 for materials (small kitchen) plus rental of the equipment for 2 days and dinner for one very handy friend to show us how. We did it in a weekend and what a difference. Now we just need me to do the rest of the facelift!!
daybydaybyday
9 år sedanI really like the colors you chose for the cabinets. It looks great!
If you no longer need the old oven, I would remove that and use that cubby as a place for all of your small appliances (mixer, toaster, blender, coffee maker, etc.). Maybe hang a curtain to cover that space -- a sleek panel like a smooth shade, not a ruffly thing. :-)
If you have to do the reno in stages, I would do your floors first since the rest of your kitchen is so adorable. Meantime, a rug on the floor would look really nice.
Great job!- radish thanked Brenda Price
lisahicks777
8 år sedanMy husband and I recently bought a home built in 1957. I too need to give our kitchen a temporary face lift. You've done a great job! Thank you for the inspiration!radish
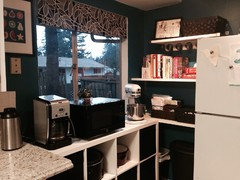
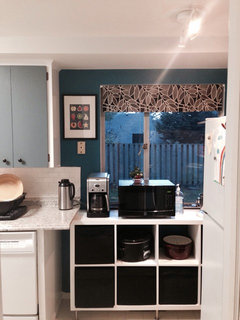
Författare8 år sedanI'm glad to hear it LisaHicks777! Here's a shot of the far wall, which I've finally gotten organized:
kathleen MK
8 år sedanawesome work! Even with citrustrip it takes a lot of elbow grease to strip that much paint.radish
Författare8 år sedanThought I'd update my post and let you all know that we had an accidental remodel right before Thanksgiving :)
We replaced the countertops, which precipitated replacing the sink, faucet and tile backsplash along with all the light fixtures and outlets. Then we added some shelves and art, and I made some little valances. Having all the extra counter space is AWESOME.

Reload the page to not see this specific ad anymore


sensiblegal