ttwells

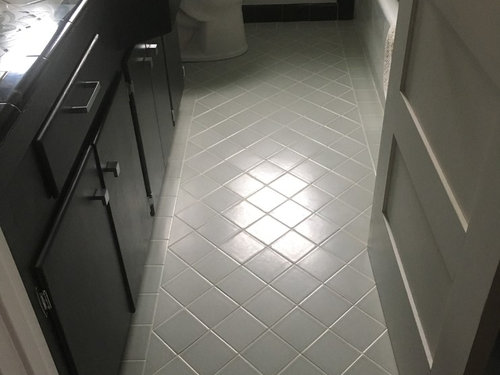
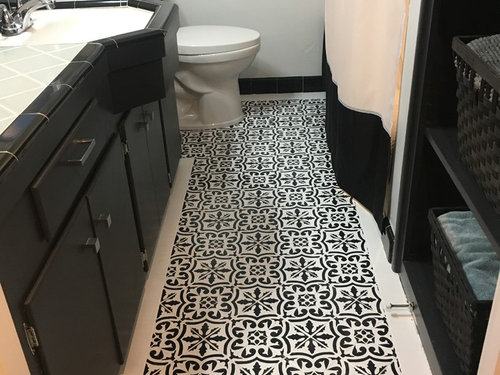
Bathroom floor - Before/After

Theresa Wells
5 år sedan

Not sure if we're going to gut this bathroom or not, so in the meantime I decided to tackle the terrible floor which I hated! Original 1956 light blue tile - didn't match the counter tile and was blah. So after much research, I used a stencil (and lots of coats of primer & sealer) to change it up. Not a forever fix, but a few year fix!


Kommentarer (18)

  • PRO
    Sergei Savateev
    5 år sedan

    Good job!

    Theresa Wells thanked Sergei Savateev
  • Toni Hamlett
    5 år sedan
    Great design
    Theresa Wells thanked Toni Hamlett
  • e s
    5 år sedan

    looks like a lot of work but looks great

    Theresa Wells thanked e s
  • K R
    5 år sedan
    That is awesome, great job modernizing the space!
    Theresa Wells thanked K R
  • RedRyder
    5 år sedan
    Well done!
    Theresa Wells thanked RedRyder
  • susan49417
    5 år sedan

    Great job!

    Theresa Wells thanked susan49417
  • Jen K (7b, 8a)
    5 år sedan
    I applaud your patience and attention to detail. a great option for the meantime. Now that you know how to do this you could start a side job :)
    Theresa Wells thanked Jen K (7b, 8a)
  • PRO
    Door Corner
    5 år sedan

    Wow, great work on this!

    Theresa Wells thanked Door Corner
  • PRO
    OTM Designs & Remodeling Inc.
    5 år sedan

    Great update!

    Theresa Wells thanked OTM Designs & Remodeling Inc.
  • spindle22
    5 år sedan
    That’s amazing!
    Theresa Wells thanked spindle22
  • Holly Brown
    5 år sedan

    WOW!! What product did you use, if you don't mind sharing? I'm in a similar situation, with horrible green tile floors in our 50's house that never look clean because the grout is so stained. An updated floor would vastly improve the room.

    Theresa Wells thanked Holly Brown
  • Cheryl Smith
    5 år sedan
    Looks great now but time will tell if it's a durable solution. Actually it is REALLY nice. I hope it stands the test of time. If it does I'd keep it as a permanent solution
    Theresa Wells thanked Cheryl Smith
  • schnable1
    5 år sedan
    grout can be proffessionaaly cleaned then resealed or stained if you want a different color. Check Homeadvisor in your area.
  • Theresa Wells
    Författare
    5 år sedan

    Holly, I'd love to share with a Houzzer in the same awful design challege that I was in!! 1. clean the floor really well 2. roll on Zinsser 123 primer in white - 4 coats with about 24 hours in between each. 3. black chalk paint for the stencil 4. wait 24 hours and touch up with both white & black paint 5. wait 24 hours and then roll 5 coats of Minwax Polycrylic - each with at least 12 hours dry time. So it took several days but I found it therapeutic! Oh and be sure to remove the toilet - made it so much easier! Good luck!

  • ilikefriday
    5 år sedan

    You did a fantastic job! I love to see painted floors. I stenciled my tile a few years ago. Like you, I initially covered the stencil with several layers of polycrylic. A month or so later I decided to redo the stencil and I scraped the entire floor. When I redid the stencil I coated it with polyurethane, which is much more durable. Just something to keep in mind in case your floor starts to flake. The only problem with the polyurethane is that is tends to yellow over time. I dont think I could scrape the polyurethane from the floor but with a little elbow grease it is possible to scrape the polycrylic.


  • Holly Brown
    5 år sedan

    Thanks SO much Theresa! Your floors really do look amazing, hope I can make mine look as nice.

  • mkritt
    5 år sedan
    Ändrades senast: 5 år sedan

    Your floor turned out beautifully Theresa! Like friday, I love seeing painted floors also.


    I painted and stenciled my bathroom floor over a year ago. It get daily use, is the bathroom I coax (drag) my 90lb pup in for a bath, and where my grandkids drag a stool over to wash their hands; I also have a basket with 36lbs of weights that I pull out daily...not a single scratch :)


    My method was Zinsser primer, sample Sherwin Williams paint for the base, trim paint for the stencil, and four coats of polyacrylic.

Sponsored

Reload the page to not see this specific ad anymore

Sverige
Skräddarsy min upplevelse genom att använda cookies

Houzz använder cookies och liknande teknik för att anpassa min upplevelse med relevant innehåll och det bästa Houzz produkter och tjänster kan erbjuda mig. Genom att klicka 'Acceptera' accepterar jag detta, så som det vidare beskrivs i Houzz Cookie Policy. Jag kan avvisa icke-essentiella cookies genom att klicka 'Administrera preferenser'.